前言
- 这是一个带项目的学习笔记
- 编写了一个单车后台管理系统
- 边学习边去写期间学习到了很多,也对react越来越热爱了
- 从项目搭起到一点点完善花了一定的时间
- 但是这只是react生涯的前沿
- 项目码云传送门
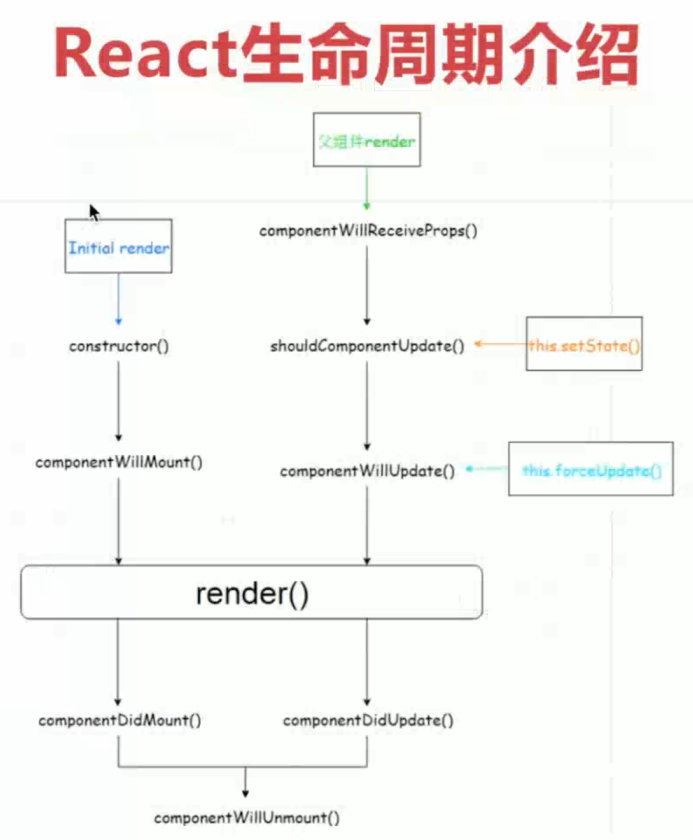
React 生命周期
- getDefaultProps 初始化Props属性(props父组件传过来的属性)
- getInitialState 初始化当前组件的状态(state变量数据)
- componentWillMount 组件初始化之前触发的生命周期(就是一开始就执行的函数)(用的比较多)
- render 渲染界面(必有的)
- componentDidMount 组件Dom调用完之后触发的生命周期 (用的比较多)
- componentWillReceiveProps 父组件数据传递调用的方法 (用的比较多)
- shouldComponentUpdate 组件更新时调用的方法
- componentWillUpdate 组件更新之前
- componentDidUpdate 组件更新之后
- componentWillUnmount 组件销毁
知识储备
静态资源
- 静态资源是什么?
- 我们在项目开发时如何存放以及使用呢?
- 静态资源就比如是图片素材等
- 因为是静态的需要配置到服务器的
- 所以我们一般直接放在public文件夹里面用的时候直接/调用即可
- 例:放在public/img/1.png
- 调用的时候直接
 这样就可以了
css
calc css计算属性(动态计算)
- calc()函数用一个表达式作为它的参数,用这个表达式的结果作为值。这个表达式可以是任何如下操作符的组合,采用标准操作符处理法则的简单表达式。
1
2
3
4
5
6
7
8
+
加法
-
减法
*
乘法,乘数中至少要有一个是 <number> 类型的
/
除法,除数(/右面的数)必须是 <number> 类型的
vh 计算单位
- 1vh 等于百分之1
项目工程配置
插件列表
- react路由5.x版本 (react-router-dom)
- api请求 (axios)
- less样式预处理(less 和 less-loader)
- antd 支付宝开发的一个ui组件库
- babel-plugin-import 给antd库配置按需加载使用
- jsonp 解决api请求跨越
- react-draft-wysiwyg draft-js draftjs-to-html 富文本
- moment 时间格式化
- redux react-redux
- redux-devtools-extension redux的调试插件
插件使用
jsonp 封装
1 | /** |
Redux 调试工具(两步都需要)
- 在Chrome 中安装Redux Devtools扩展
- yarn add redux-devtools-extension
配置webpack
暴露webpack配置
react脚手架有一个eject的可以用来暴露webpack的
1
$ yarn eject
这里插播一个坑
- 坑一、直接运行eject会报错的,这个时候呢有两个解决方法(处理完运行eject就可以了)
- 直接清除.git
- git add . 和 git commit -m “”更新一下即可
- 坑二、运行完eject有的同学就会发现为啥运行项目会报错,报的是./src/index.js里面的错(包缺损)
- 如何解决把node_modules删除重新安装即可
- 查看package.json文件会多了很多东西以及多了 scripts和config文件(配置都在里面config)
安装/配置less预处理
安装less
1
$ yarn add less less-loader
配置less
- 找到config/webpack.config.js(执行了eject才会有这个文件)
1
2
3
4
5
6
7
8
9
10
11
12
13
14
15
16
17
18
19
20
21
22
23
24
25
26
27
28
29
30
31
32
// 1. 添加less的名头(大概41行左右学着css那个来)
// style files regexes 找到这句话就找到了
// 添加 less 解析规则
const lessRegex = /\.less$/;
const lessModuleRegex = /\.module\.less$/;
// 2. 添加解析配置 (大概404行左右跟在css的配置后面放)
// Less 解析配置
{
test: lessRegex,
exclude: lessModuleRegex,
use: getStyleLoaders(
{
importLoaders: 2,
sourceMap: isEnvProduction && shouldUseSourceMap,
},
'less-loader'
),
sideEffects: true,
},
{
test: lessModuleRegex,
use: getStyleLoaders(
{
importLoaders: 2,
sourceMap: isEnvProduction && shouldUseSourceMap,
modules: true,
getLocalIdent: getCSSModuleLocalIdent,
},
'less-loader'
)
},
- 测试是否成功(看到图标下面的文件变红为成功)
编写一个test.less文件(写一段变红的样式)
1
2
3
.test {
color: red;
}在App.js引入测试(这里只是修改代码其他的我删了你不要删)
1
2
3
4
5
import './test.less'
<p className="test">
Edit <code>src/App.js</code> and save to reload.
</p>
安装/配置antd
安装 antd、babel-plugin-import(配置按需加载)
1
$ sudo cnpm i antd babel-plugin-import -s
配置自动引入antd样式(暴露代码后webpack 4.19版本)
注:如果在package.json中没有看到上面的形式,则需要先 reject项目。1
2
3
4
5
6
7
8
9
10
11
12
13
14
15// 找到babel改成这样即可
"babel": {
"presets": [
"react-app"
],
"plugins": [
[
"import",
{
"libraryName": "antd",
"style": "css"
}
]
]
}引入调用 (没报错看到蓝色的按钮为正确)
1
2
3
4
5
6
7
8
9
10
11
12
13
14
15
16import React,{Component} from 'react'
import {Button} from 'antd';
export default class Test extends Component {
testclick = () => {
console.log('a')
}
render () {
return (
<div>
test
<Button type="primary" onClick={this.testclick}>Button</Button>
</div>
)
}
}
antd自定义主题 (确保less已经配置好以及webapck暴露,需要less才可以)
加入主题 (./config/webpack.config.js)
1
2
3
4
5
6
7
8
9
10
11
12
13
14
// 修改配置,配置好less的 大概在110行左右,页面搜preProcessor即可最后那两个的位置哪里
// 把整个if替换成我这样就可以了,主题里面的颜色可以自己改
if (preProcessor === "less-loader") {
loaders.push({
loader: require.resolve(preProcessor),
options: {
sourceMap: isEnvProduction && shouldUseSourceMap,
modifyVars: { //自定义主题
'primary-color': 'red',
},
javascriptEnabled: true,
},
});
}修改package.json(刚才配置的时候是css,切换主题需要使用true才可以)
1
2
3
4
5
6
7
8
9
10
11
12
13
14
15
"babel": {
"presets": [
"react-app"
],
"plugins": [
[
"import",
{
"libraryName": "antd",
- "style": "css", // 去除
+ "style": true
}
]
]
}
配置eslint
修改想修改的配置(必须eject暴露了的)
- 我这里是关闭eqeqeq 这个规则是限制必须使用=== 不能用== 我使用off关闭了
1
2
3
4
5
6
"eslintConfig": { // 找到这个然后添加自己想要添加的配置
"extends": "react-app",
"rules": {
"eqeqeq": "off"
}
}
项目工程化
- 项目架构设计
- 目录结构配置
- 制定开发规范(ESLint)
- 模块化、组件化
- 前后端接口规范
- 性能优化、自动化部署