小程序中ES6类
- 在小程序中我们也是可以使用ES6的语法去是实现我们的业务逻辑
- 在ES6中新增了,类方法那我们就来一起用一样吧
- 实际与后端的类没有区别
创建类
1
2
3
4
5
6
7
8
9
10
11
12
13
14
15
// class 构建一个类
class Home{
// 类的构造函数
constructor () {
}
// 自定义的类内部方法
getBannerData () {
...
}
}
//外部想要使用这个类就需要向export抛出这个类
export {Home};使用类
1
2
3
4
5
6
7
8
9
10
11
12
13
// 1.首先引入这个类 home-mode.js这个是我的类文件名
import {Home} from 'home-model.js';
// 2.实例化 home-model 的home类
var home = new Home();
// 3.调用
Page({
onLoad: function () {
// 调用方法
home.getBannerData(() => {
....
})
}
})
小程序中ES6类继承
1 | // 1.引入类 |
requert请求封装 (如何使用上面说了)
- 在我们调用后端的api的时候我们会大量的去请求后端的Api,这样会使得我们前端的业务逻辑不断的重复
- 我们使用面向对象的方式对请求函数做了封装
- 这样我们代码的复用性更高,代码的重复性更少
- 封装这种复用性很高的函数时我们都要创建基类使得让其他的类去继承使用
1
2
3
4
5
6
7
8
9
10
11
12
13
14
15
16
17
18
19
20
21
22
23
24
25
26
27
28
29
30
31
32
33
34
35
36
37
38
39
40
41
42
43
44
45
46
47
48// 1. utils/base.js 创建utils 新疆base基类文件
// 2. 新建 config.js 用来储存公共数据或配置信息
// 3. 引入配置类
import {Config} from 'config.js'
// 2. 创建基类Base
class Base {
// 构造函数
constructor() {
// 获取配置在信息类的 公共url信息
this.baseRequestUrl = Config.restUrl;
}
/**
* 请求封装
*/
request (params) {
// url内外拼接
var url = this.baseRequestUrl + params.url;
// 判断没有传获取方式默认为get
if (!params.type) {
params.type = 'GET'
}
// 调用微信请求api
wx.request({
url: url,
data: params.data,
method: params.type,
header: {
'content-type':'application/json',
'token': wx.getStorageSync('token')
},
success: res => {
// 判断函数,存在才调用
// 返回信息的函数回调
params.sCallback&¶ms.sCallback(res.data);
},
fail: err => {
console.log(err);
}
})
}
}
export {Base};
小程序自定义模版
- 在我们的页面开发中也会存在很多的页面会有复用
- 那我们定义一个模块模版就更容易让我们使用
创建模版
1
2
3
4
5
6
7
// 模版
// 为模版加name 唯一标示用来调用的时候用的,其实内部和写html没有区别
<template name="products">
<view class="products-box">
</view>
</template>调用模版
1
2
3
4
5
6
7
8
9
10
<!-- 引入模版文件 -->
<import src="../tpls/products/products-tpl.wxml" />
<view>
<!-- 使用模版和定义一样只是吧name改为is就可以了 -->
<!-- data给模版传递数据 -->
<!-- 做一个对象传递过去使用起来会方便一点,方法名自定义 -->
<!-- key为products 传递的值为productsArr -->
<template is="products" data="{{products:productsArr}}"></template>
</view>
事件绑定、页面跳转、数据传输
- 小程序中的事件绑定就是 bindtap 后面带函数名
- 页面跳转 wx.navigateTo api调用
- 页面之间数据传输,可以同url传输
数据绑定,数据传输
1
2
3
4
5
6
7
8
9
10<swiper indicator-dots="true" autoplay="true" class="swiper">
<block wx:for="{{bannerArr}}" wx:key="index">
<!-- 事件绑定,bindtap绑定事件,后面带方法名就可以了 -->
<!-- 数据传输 data-开头后面自定义名字 -->
<!-- 没有为什么微信规定的反正就这么干 -->
<swiper-item data-id="{{item.key_word}}" bindtap="onProductsItemTap">
.....
</swiper-item>
</block>
</swiper>实现方法,跳转页面
1
2
3
4
5
6
7
8
9
10
11
12
13
14
15
16
17
18
19
20
21
22
Page({
/**
* banner点击事件
* event自带的变量
*/
onProductsItemTap: function (event) {
// id,存放在event.currentTarget.dataset.id中
// 所有传过来的数据都在 event.currentTarget.dataset 中,传过来的时候是不带data的要记住
// 这里我做了一个小小的封装提高复用性,放在了基类中
//getDataSet(event,key) {
// return event.currentTarget.dataset[key];
//}
var id = home.getDataSet(event,"id");
// 调用接口
// url就是你要跳转页面的地址
// 可以通过url传送参数到页面中去
wx.navigateTo({
url: '../product/product?id=' + id,
});
}
})跳转的页面获取调整前传过来的数据
1
2
3
4
5
6
7
8
9
10
11
12
13
Page({
/**
* 生命周期函数--监听页面加载
* 就是在跳转后的页面js文件中, onload 里面获取
* options是自带的常量
*/
onLoad: function (options) {
// 传的是命名什么就.什么
var id = options.id;
console.log(id)
}
})
动态修改导航栏
- wx.setNavigationBarTitle
1
2
3
4
5
6
7
8
9
/**
* 生命周期函数--监听页面初次渲染完成
*/
onReady: function () {
// 动态设置导航栏
wx.setNavigationBarTitle({
title: this.data.name
})
}
拒绝频繁向服务器请求数据
- 在我们请求数据时使用对象保存起来
- 再次请求前判断以请求的不让请求直接再对象中获取
触底刷新
1 | /** |
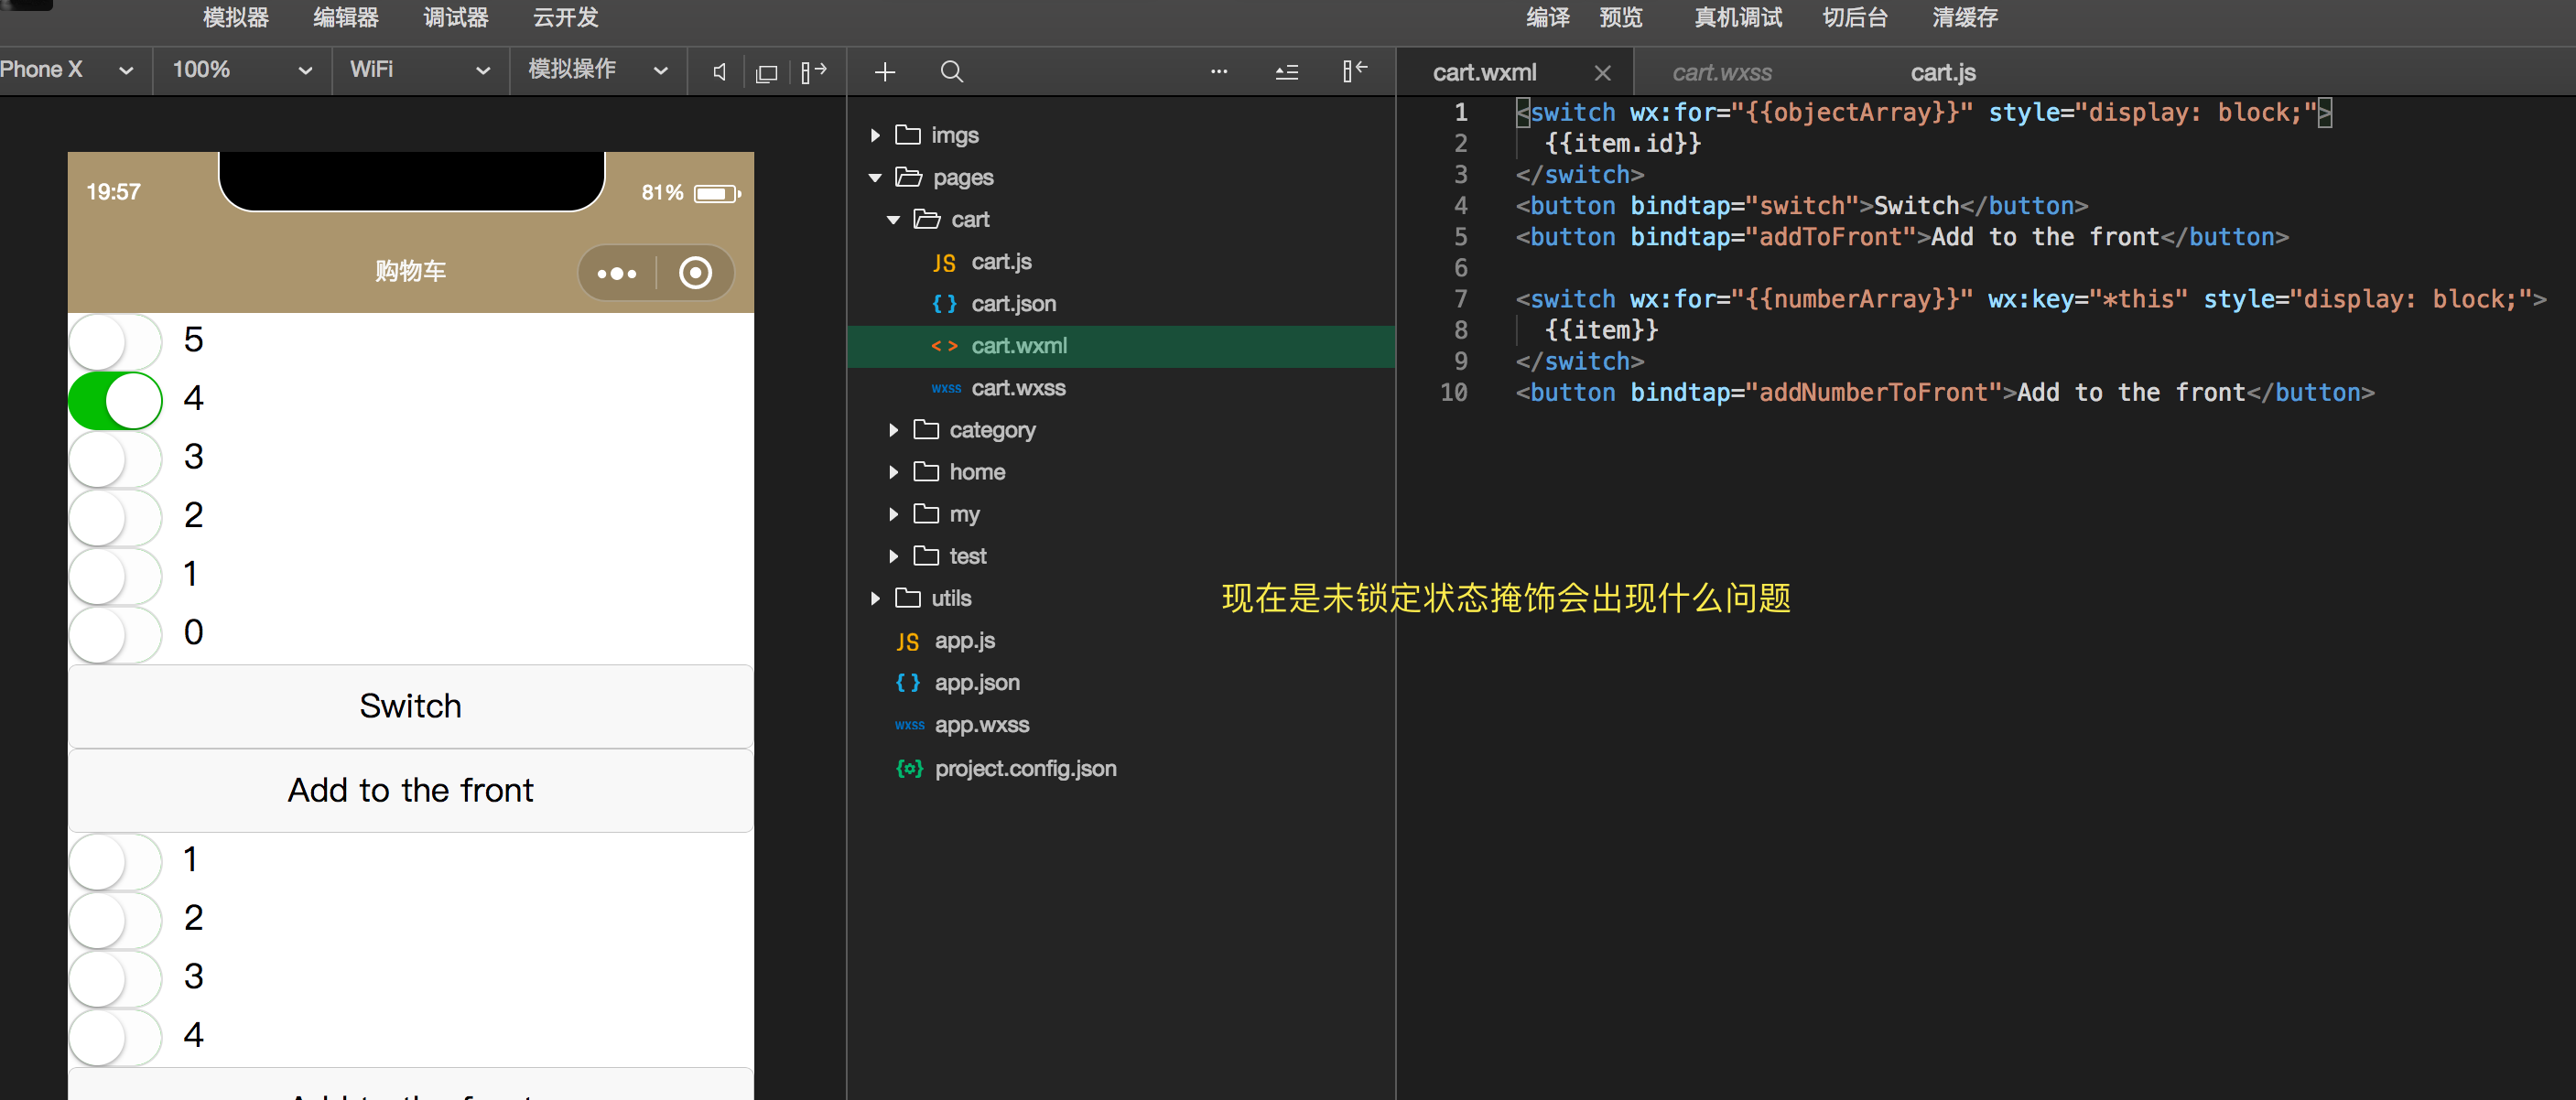
wx:key 官网
- 这个也是挺重要的,用来锁定属性
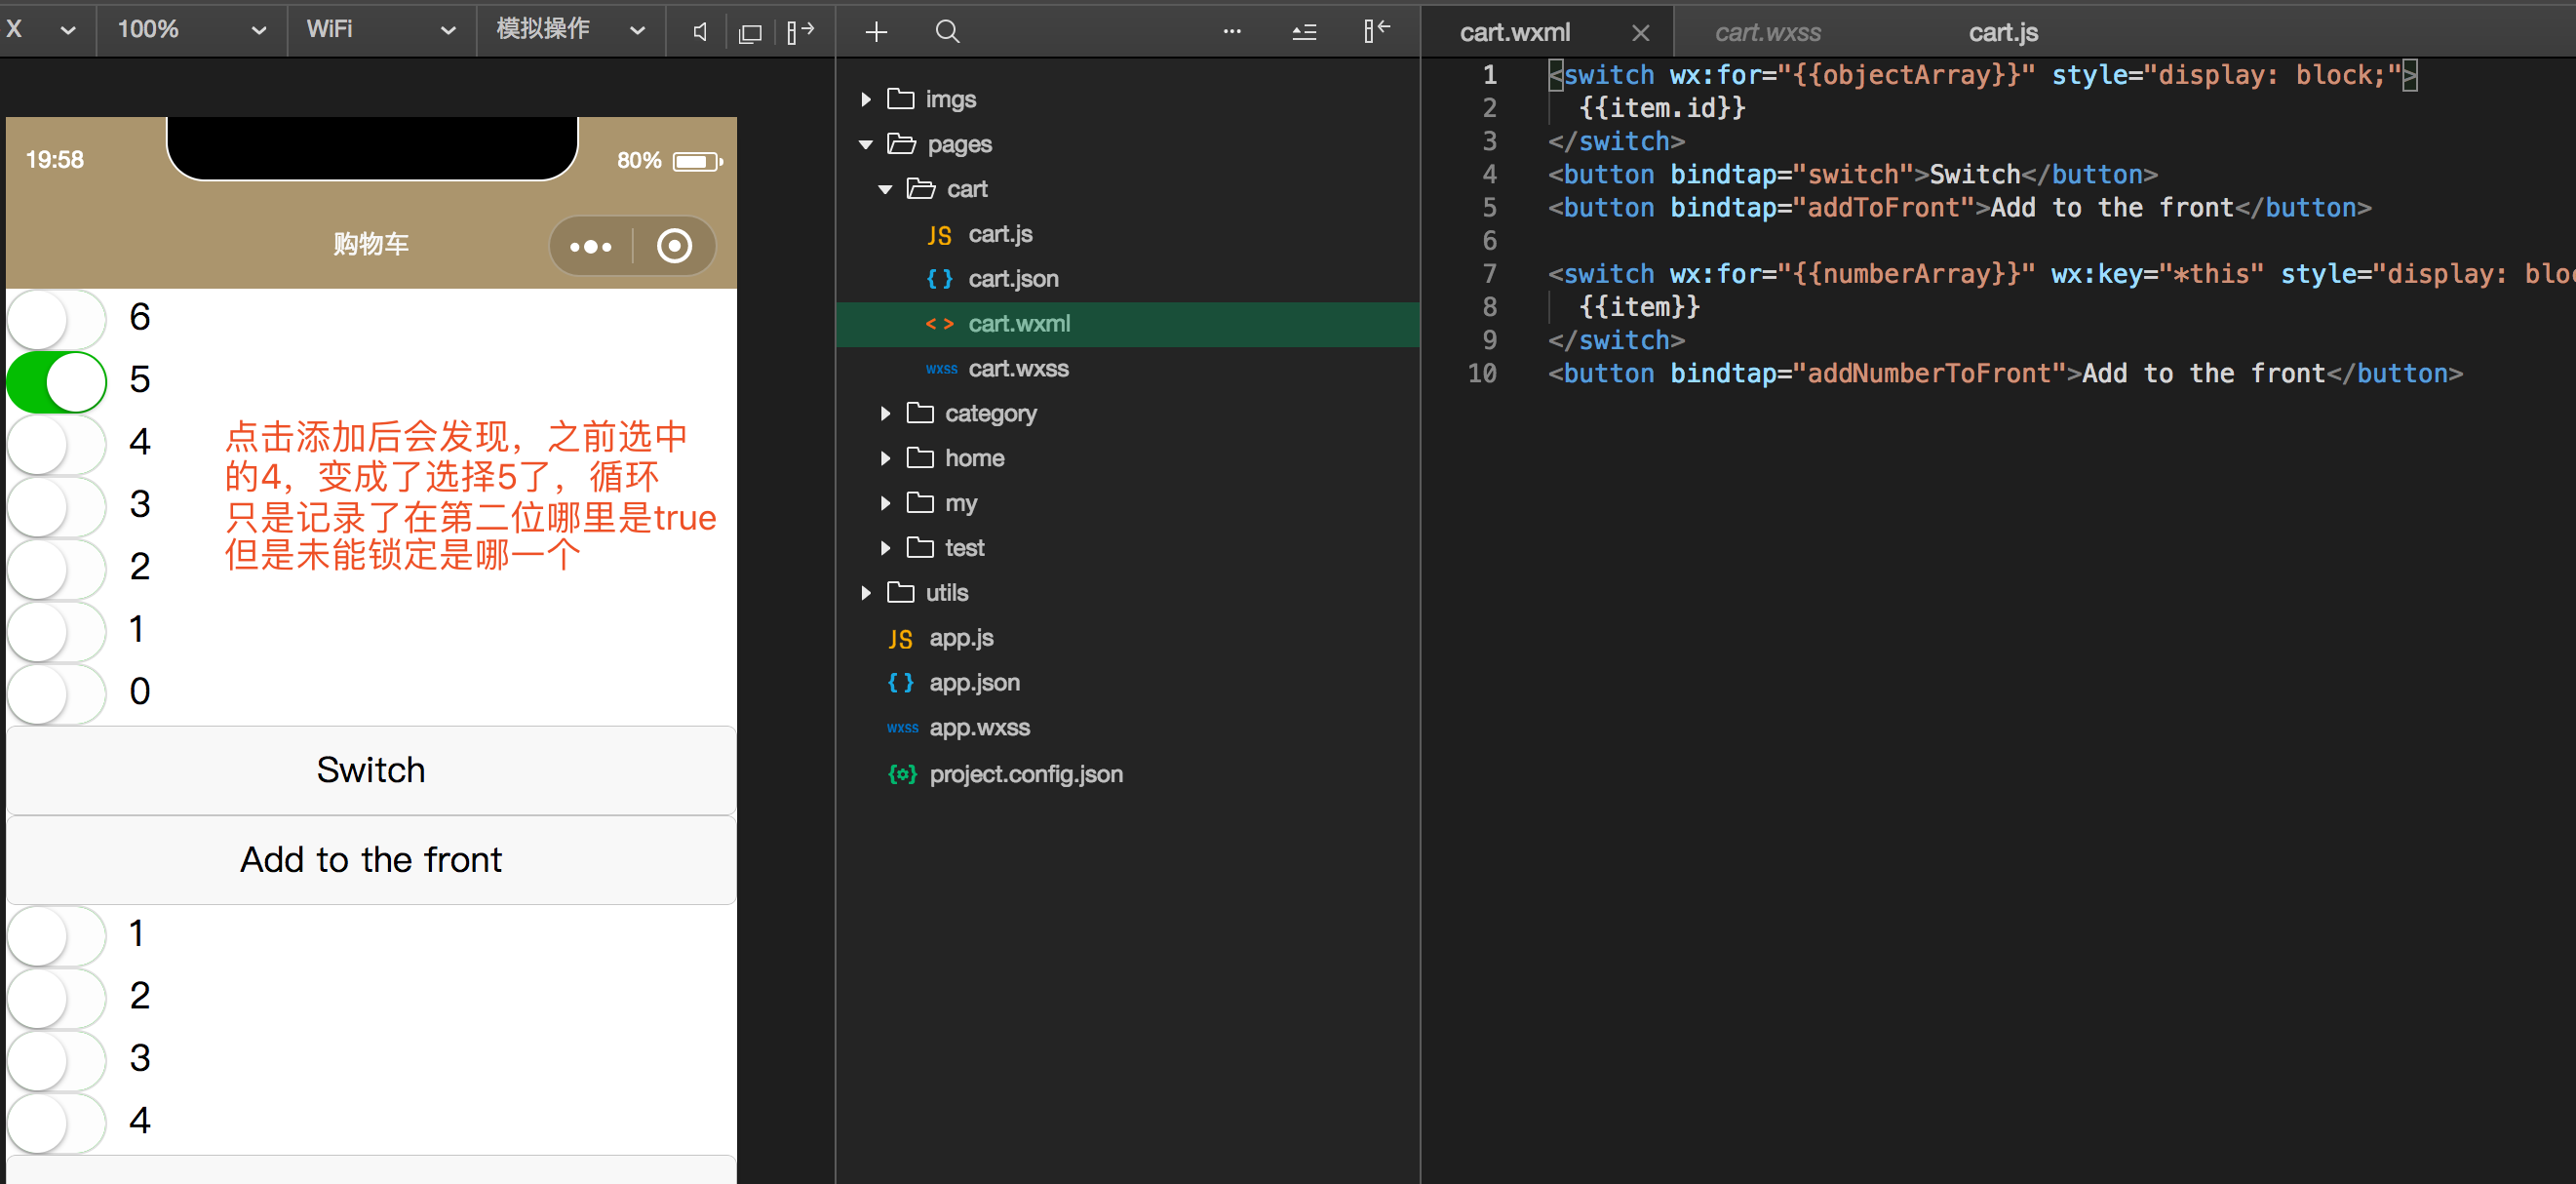
- 我们在微信中使用for循环时,如果我们使用创建添加数据后,可能会造成数据的村乱
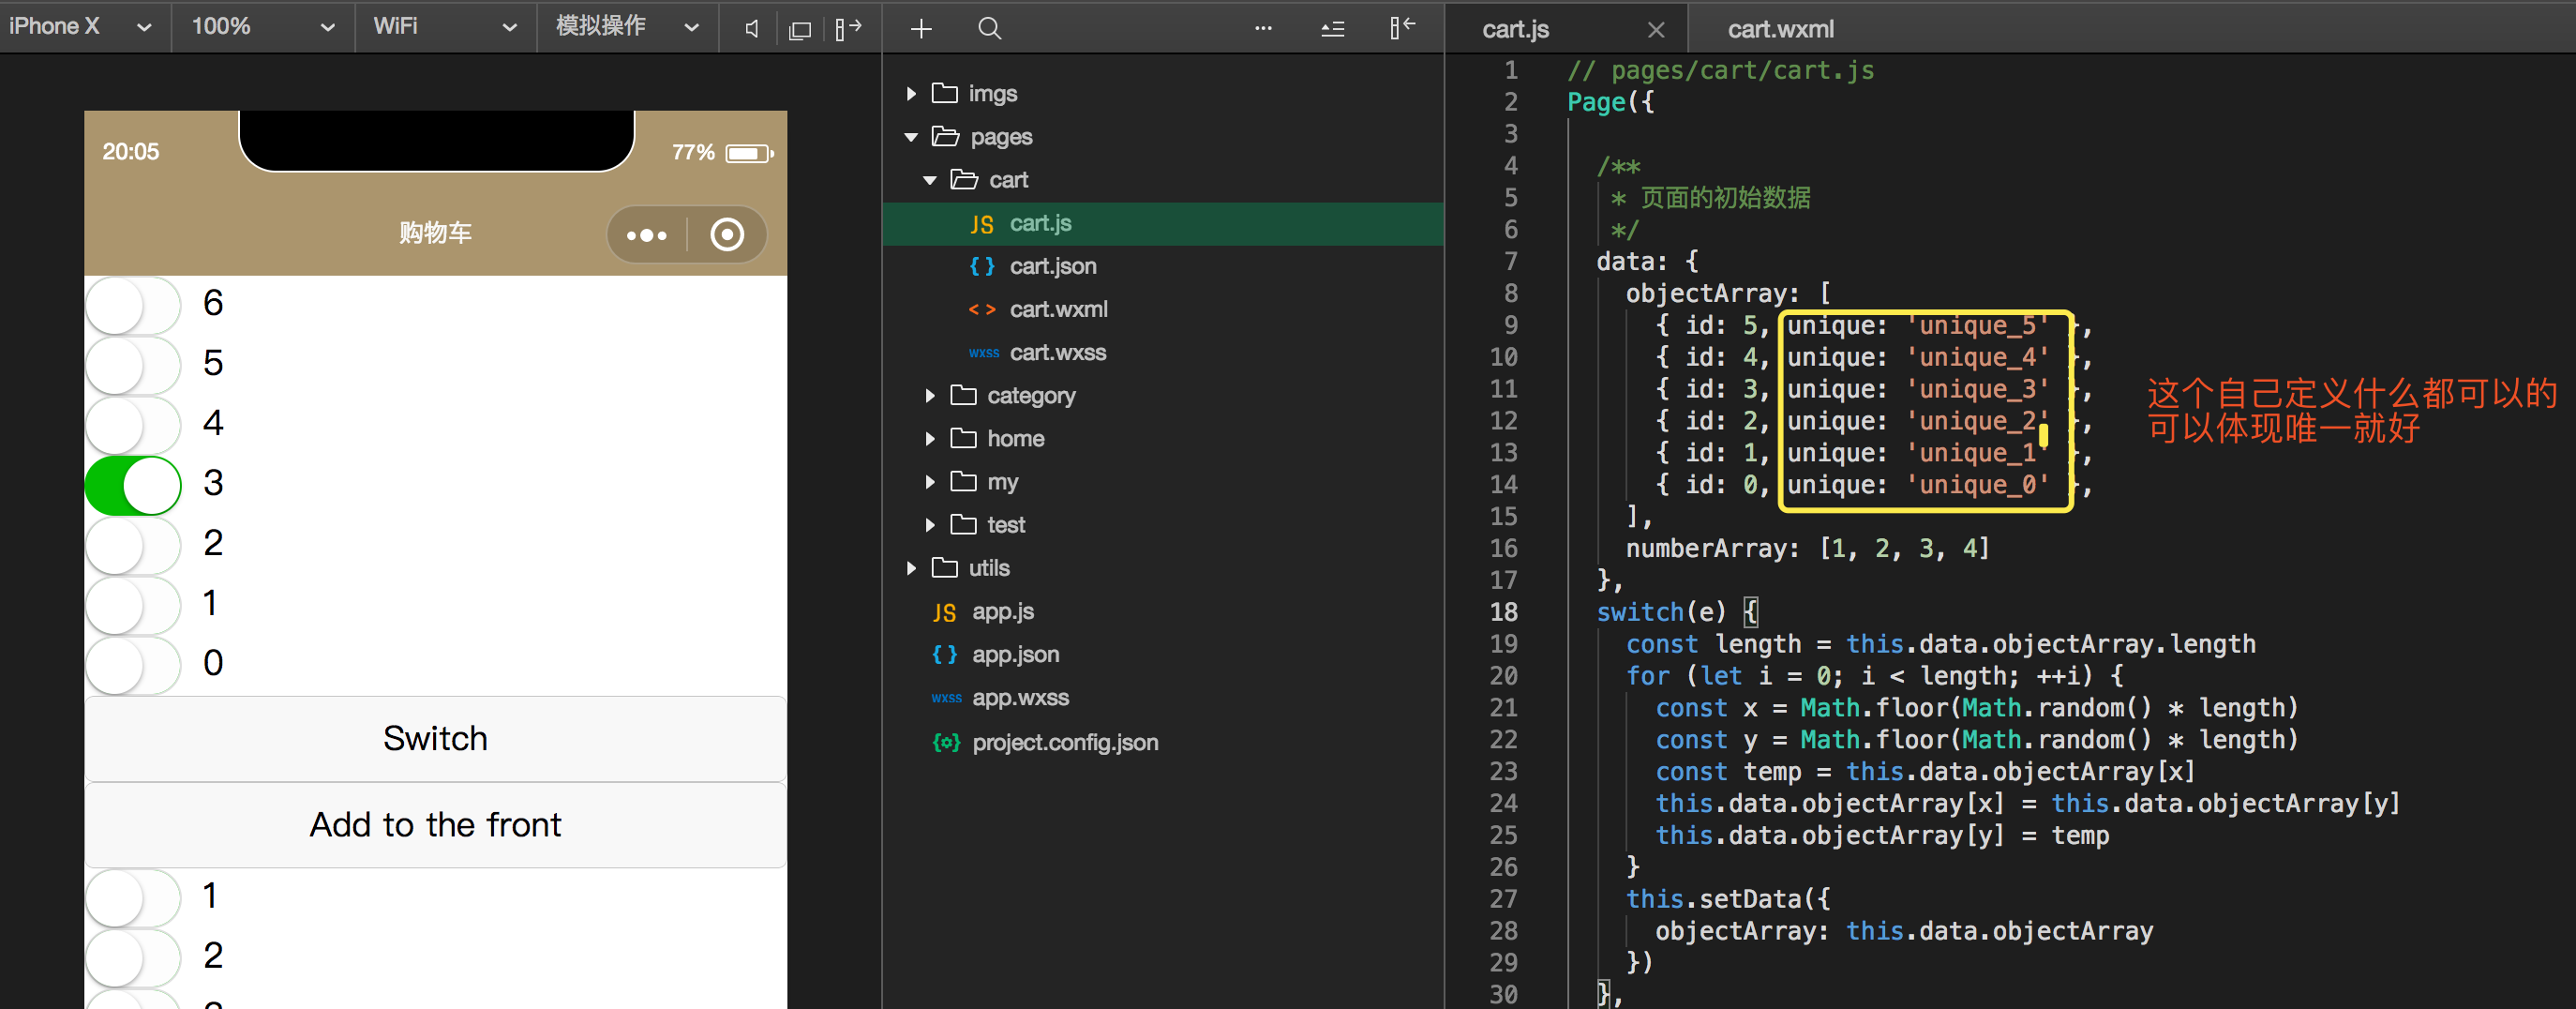
- 可以自定义唯一表示也可以,使用本地的*this也是可以的
- 文字说不清楚直接来例子
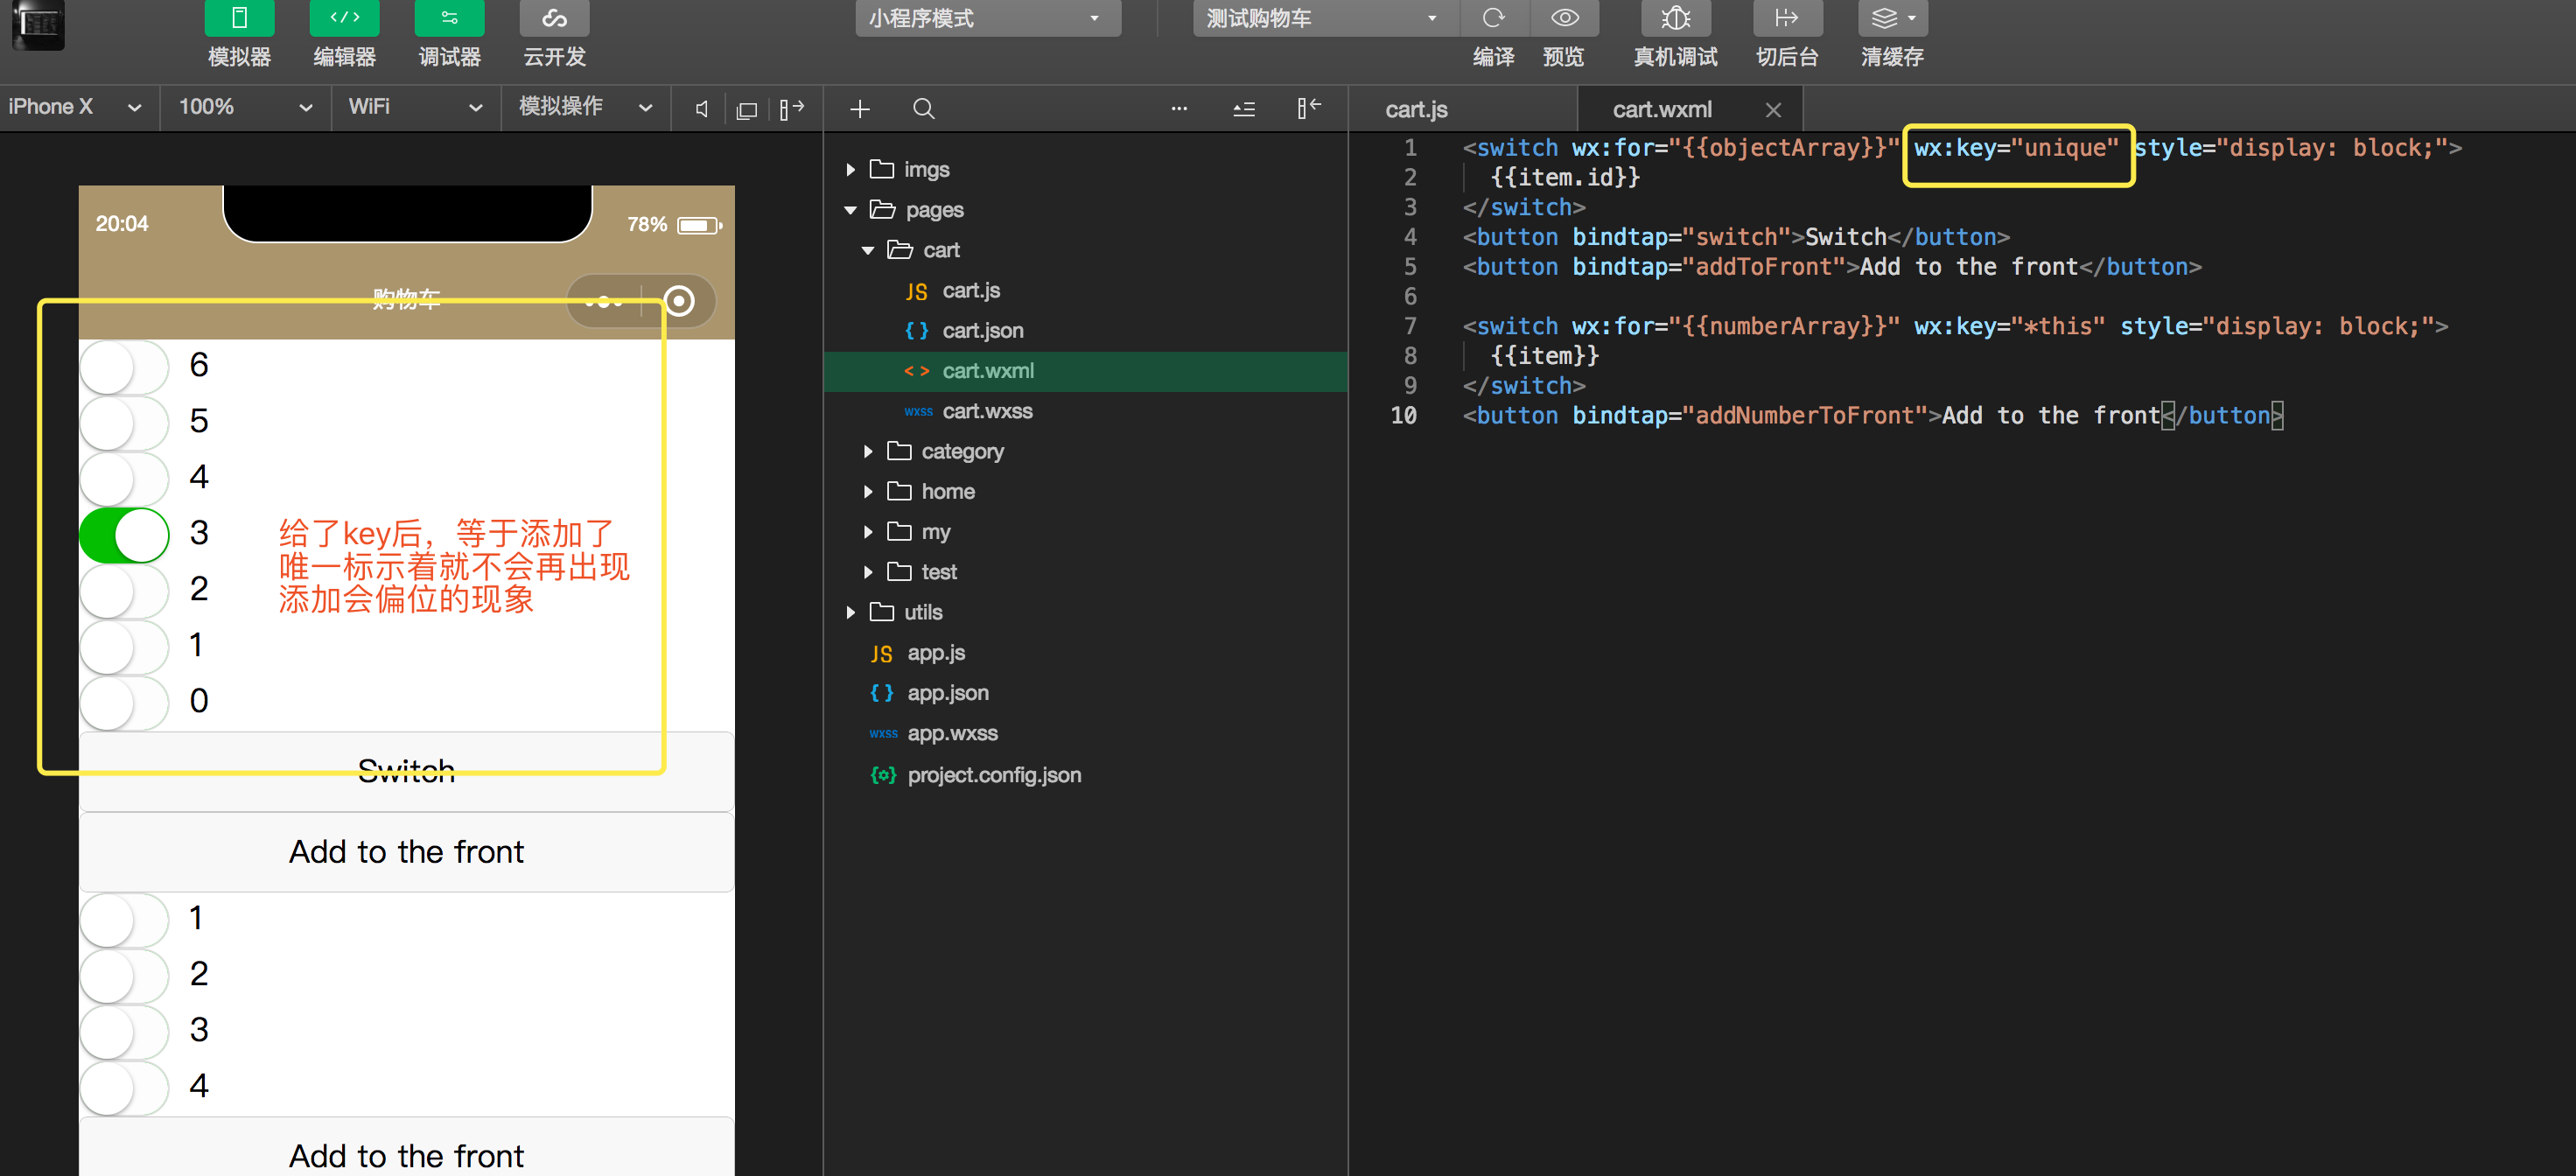

1 | <switch wx:for="{{objectArray}}" wx:key="unique" style="display: block;"> |
1 | Page({ |